Friday, December 3, 2010
Story, the opening


Monday, October 4, 2010
Paintin'
 The days are running out, and I'm trying to finish as many new pieces for my show as possible amidst commissions & a generally busy October.
My toes are cold as frozen fish sticks. I think I need some new slippers, these ones have lost most of their coziness since last winter.
Monday, September 20, 2010
Story, a collection of paintings by Andre Jolicoeur

At long last, a chance to see all my best paintings in the flesh. I'm having a solo painting exhibit downtown Peterborough, at the Cannery on Hunter St. The show will run from Nov 5-30, and the reception is on Friday November 5th. If you're in town and not too busy with your church group or homeless friends, stop by!
Tuesday, September 7, 2010
Illustration Tutorial: DIY Wooden Canvas Frames
Tutorial: DIY Wooden Canvas Frames
Video tutorial:
Materials
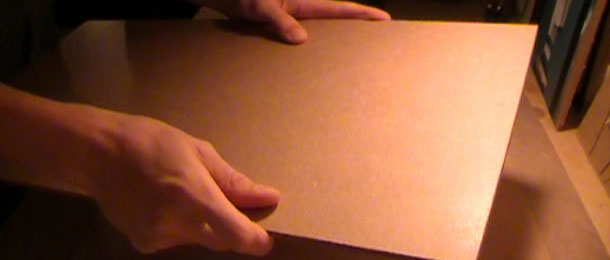 |
1. Wood Surface Get some plywood or masonite or whatever is on sale. Just choose your surface based on how it feels and how well it'll suit your painting style. Keep your eye peeled for recycled wood! You wouldn't believe what people throw away... |
 |
2. Wood Planks Choose a thickness for the sides of your canvas. This one is 3/4 x 1 1/2 inch. |
 |
3. Saw I tried to make this tutorial use no power tools, but I couldn't think of a good way to cut the surface wood in a straight line. So I'm going to recomend that you use a saw of some sort. Either a jigsaw or a circular saw will do. |
 |
4. Miter Box & Hand Saw You'll need something to cut diagonal lines. Obviously if you have a chopsaw you'll use that. But if you have a chopsaw, you probably don't need my stupid tutorial to teach you how to make the most basic of contraptions. For the rest of you, grab a miter box. Super cheap and does the job perfectly. |
 |
5. Hammer & Finishing Nails Just dig out that old hammer from under your couch, and borrow some nails from your neighbor. |
 |
6. Glue Use either wood glue, or LaPage PL9000 Heavy Duty Construction Adhesive (I reccomend the adhesive, it's strong enough to stand the test of time). |
 |
7. Primer I use gesso. |
Steps
 |
1. Cut the Wood surface If you buy your wood at Home Depot, you can have them cut it into managable sizes for you. Handy to keep lots of wood around, you never know when the art bug will bite. Draw out your canvas shape and cut it out. Measure twice, cut once. |
 |
2. Cut the Planks Measure your cut wood surface. Cut the planks to match your outer surface dimensions, but with 45 degree angles at the corners to create a seamless edge. Measure twice, cut once. |
 |
3. Nail the Frame Together You can use some extra adhesive to make that bond nice & tight. |
 |
4. Apply Glue Cover the top edge of your frame with a line of adhesive. |
 |
5. Secure the Bond Place the surface of your canvas board on the glued frame. Use something to clamp it down, or place a larger piece of something overtop and use something heavy to weight it down. Wait overnight to let the adhesive set. Use sandpaper to smooth out any rough edges. Use wood glue to fill any gaps/cracks/nail holes. Then prime it with whatever primer you fancy. I like gesso. |
 |
6.Paint Now go art! |
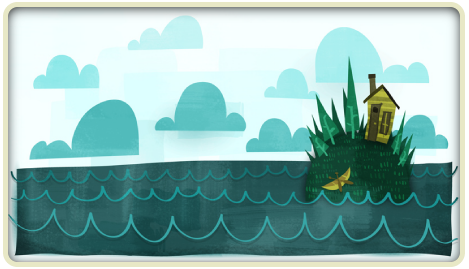
Monday, September 6, 2010
Dream House
I call this one dreamhouse. Somewhat derived from my agoraphobia, I yearn to distance myself from the civilized world. Don't get me wrong, it's nothing personal. In fact, if I could choose you'd come with me, and we'd sing campfire songs together every night and skinny dip under the starlight. But it's the rest of the humans that I'd like to be separated from by a big body of water. Of course, you're more than welcome to visit whenever you wish. Just park your canoe beside mine and knock thrice. I'll have hot coffee and toast waiting.
|
Sunday, August 29, 2010
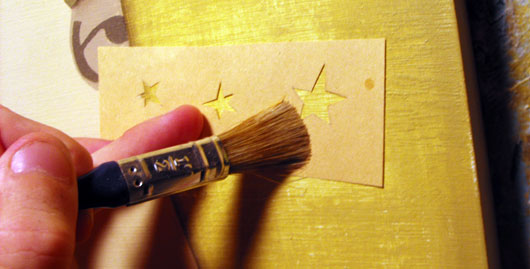
Illustration Tutorial: Masking Shapes while Painting
Here it is, my first video tutorial. I plan on doing a handful of these, and this one is basically a test to see how it looks all edited and uploaded. Looking back I think it was a moderate success, but I promise the next one will be more informative & entertaining. Until then... |
 |
|

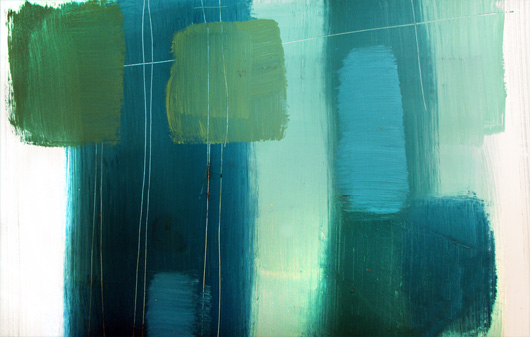
Abstract Afternoon
Saturday, August 28, 2010
"Cheers"
| He was saving the bottle of wine for a special occasion. But it seemed that special occasion would never come. But on second thought, why isn't this occasion special? Why not toast to a life well lived, with the company of the moon and the stars, right here, right now, at the end of all things... It's as special an occasion as they come, so "cheers". And when our own health fails, our loved ones pass on, and all hope fades, don't wait any longer to open that bottle you were saving - because every moment of your life is a special occasion, special enough to savor. |
 |
Detail:
|
Post No Bills, Illustration Show


My "La Fin Du Monde" 3d poster will be on display:
Wednesday, August 25, 2010
Coming Soon

Saturday, August 21, 2010
The Dangers of Braining
| I have a problem. When I'm in the midst of creative fury, I often can't get anything done. The problem is when I get too deep in my own thoughts I stop existing in the real world. I call it "Braining", and it's my worst enemy for productivty. It usually goes like this - I'm working, I reach a step that brings my mind elsewhere, and 30 minutes later I realize I've been pacing back & forth spending time in my own brain instead of working. |  |
| In many ways it's not such a bad thing. I mean, it's sort of a pure creative act, fast paced conceptualizing of idea after idea. Admittedly some if not all of my best ideas are born this way. So you might say that braining is actually an important part of my creative process. I know this, which is why I often allow myself to brain more than I should, because I tell myself it's okay to let my mind wander endlessly because I'm creating, and it just feels right. The problem is that it's so easy and enjoyable to live inside your own head that the real world (and the task at hand) takes a back seat to the conceptual world. Which is all well and good, but at the end of the day what do you have to show for it? I may have spent my afternoon coffee's energy throwing around some great notions and made some terrific growth, but if I walk away empty handed then I've failed at the one thing I know I should have been doing - making paintings. | |
The Elusive Forest Whale
 |
Detail:
|